Ithura for Okta: SSO and SCIM setup
Connect Ithura to Okta for single sign-on and automated user provisioning. Add Ithura from the Okta Integration Network, point it at your Ithura workspace, and your team signs in with Okta while joiners and leavers stay in sync through SCIM.
This guide is written for the Okta administrator who is adding Ithura from the OIN catalog, together with the Ithura workspace admin who owns the workspace. You will move a few values between the two consoles, so keep both open.
Supported features
The Ithura Okta integration supports the following OIN features:
- SP-initiated SSO
- IdP-initiated SSO
- Just-In-Time (JIT) provisioning
- Create Users (SCIM)
- Update User Attributes (SCIM)
- Deactivate Users (SCIM)
- Reactivate Users (SCIM)
- Group Push (SCIM)
Single sign-on uses SAML 2.0. Provisioning uses SCIM 2.0 and is inbound only: Okta is the source of truth for who has access.
Features not supported
- Import Users. Okta cannot import users FROM Ithura into Okta. Ithura is the target of provisioning, not a source. Manage the user directory in Okta and let SCIM push changes into Ithura.
- Profile Sourcing. Ithura does not push profile-attribute changes back to
Okta. Changes made in Ithura's Members page stay in Ithura and are overwritten
the next time Okta pushes the SCIM user attributes. Treat Okta as authoritative
for
name,email, andactive; if you need to correct a user's profile edit it in Okta, not in Ithura. - Sync Password. Ithura does not accept password pushes from Okta; SSO members authenticate through the SAML flow and do not have a local password.
- Attribute Writeback. No SCIM PATCH or PUT from Ithura back to Okta.
Prerequisites
- An Ithura workspace. Single sign-on is included on the Pro plan; SCIM
provisioning requires the Enterprise plan. Check or upgrade your plan at
/{workspace}/settings/billing. - Workspace admin access (role 20) to that Ithura workspace. You configure the
connection at
/{workspace}/settings/sso. - Okta administrator access, with permission to add and assign applications.
- Your Ithura workspace name: the slug in your workspace URL, for example
acmeinhttps://ithura.com/acme. You enter this in Okta so the integration targets your workspace.
Keep the Ithura SSO settings page (/{workspace}/settings/sso) open in a second
tab while you work. You copy values between it and Okta.
Add Ithura from the Okta Integration Network
- In the Okta Admin Console, go to Applications -> Applications, click Browse App Catalog, and search for Ithura.
- Open the Ithura listing and click Add Integration.
- On General Settings, enter your Ithura workspace name (the slug from your workspace URL). This value builds the SAML and SCIM endpoints for your workspace, so it must match exactly. Continue through the wizard.
Because the endpoints are scoped to your workspace, the integration builds them for you from the workspace name:
- ACS (Reply) URL:
https://api.ithura.com/sso/<workspace>/saml/acs - SP Entity ID (Audience):
https://api.ithura.com/sso/<workspace>/saml/metadata
Configure SAML single sign-on
1. Give Okta's metadata to Ithura
- On the Ithura app in Okta, open the Sign On tab and find Identity Provider metadata. Copy the metadata URL or the XML.
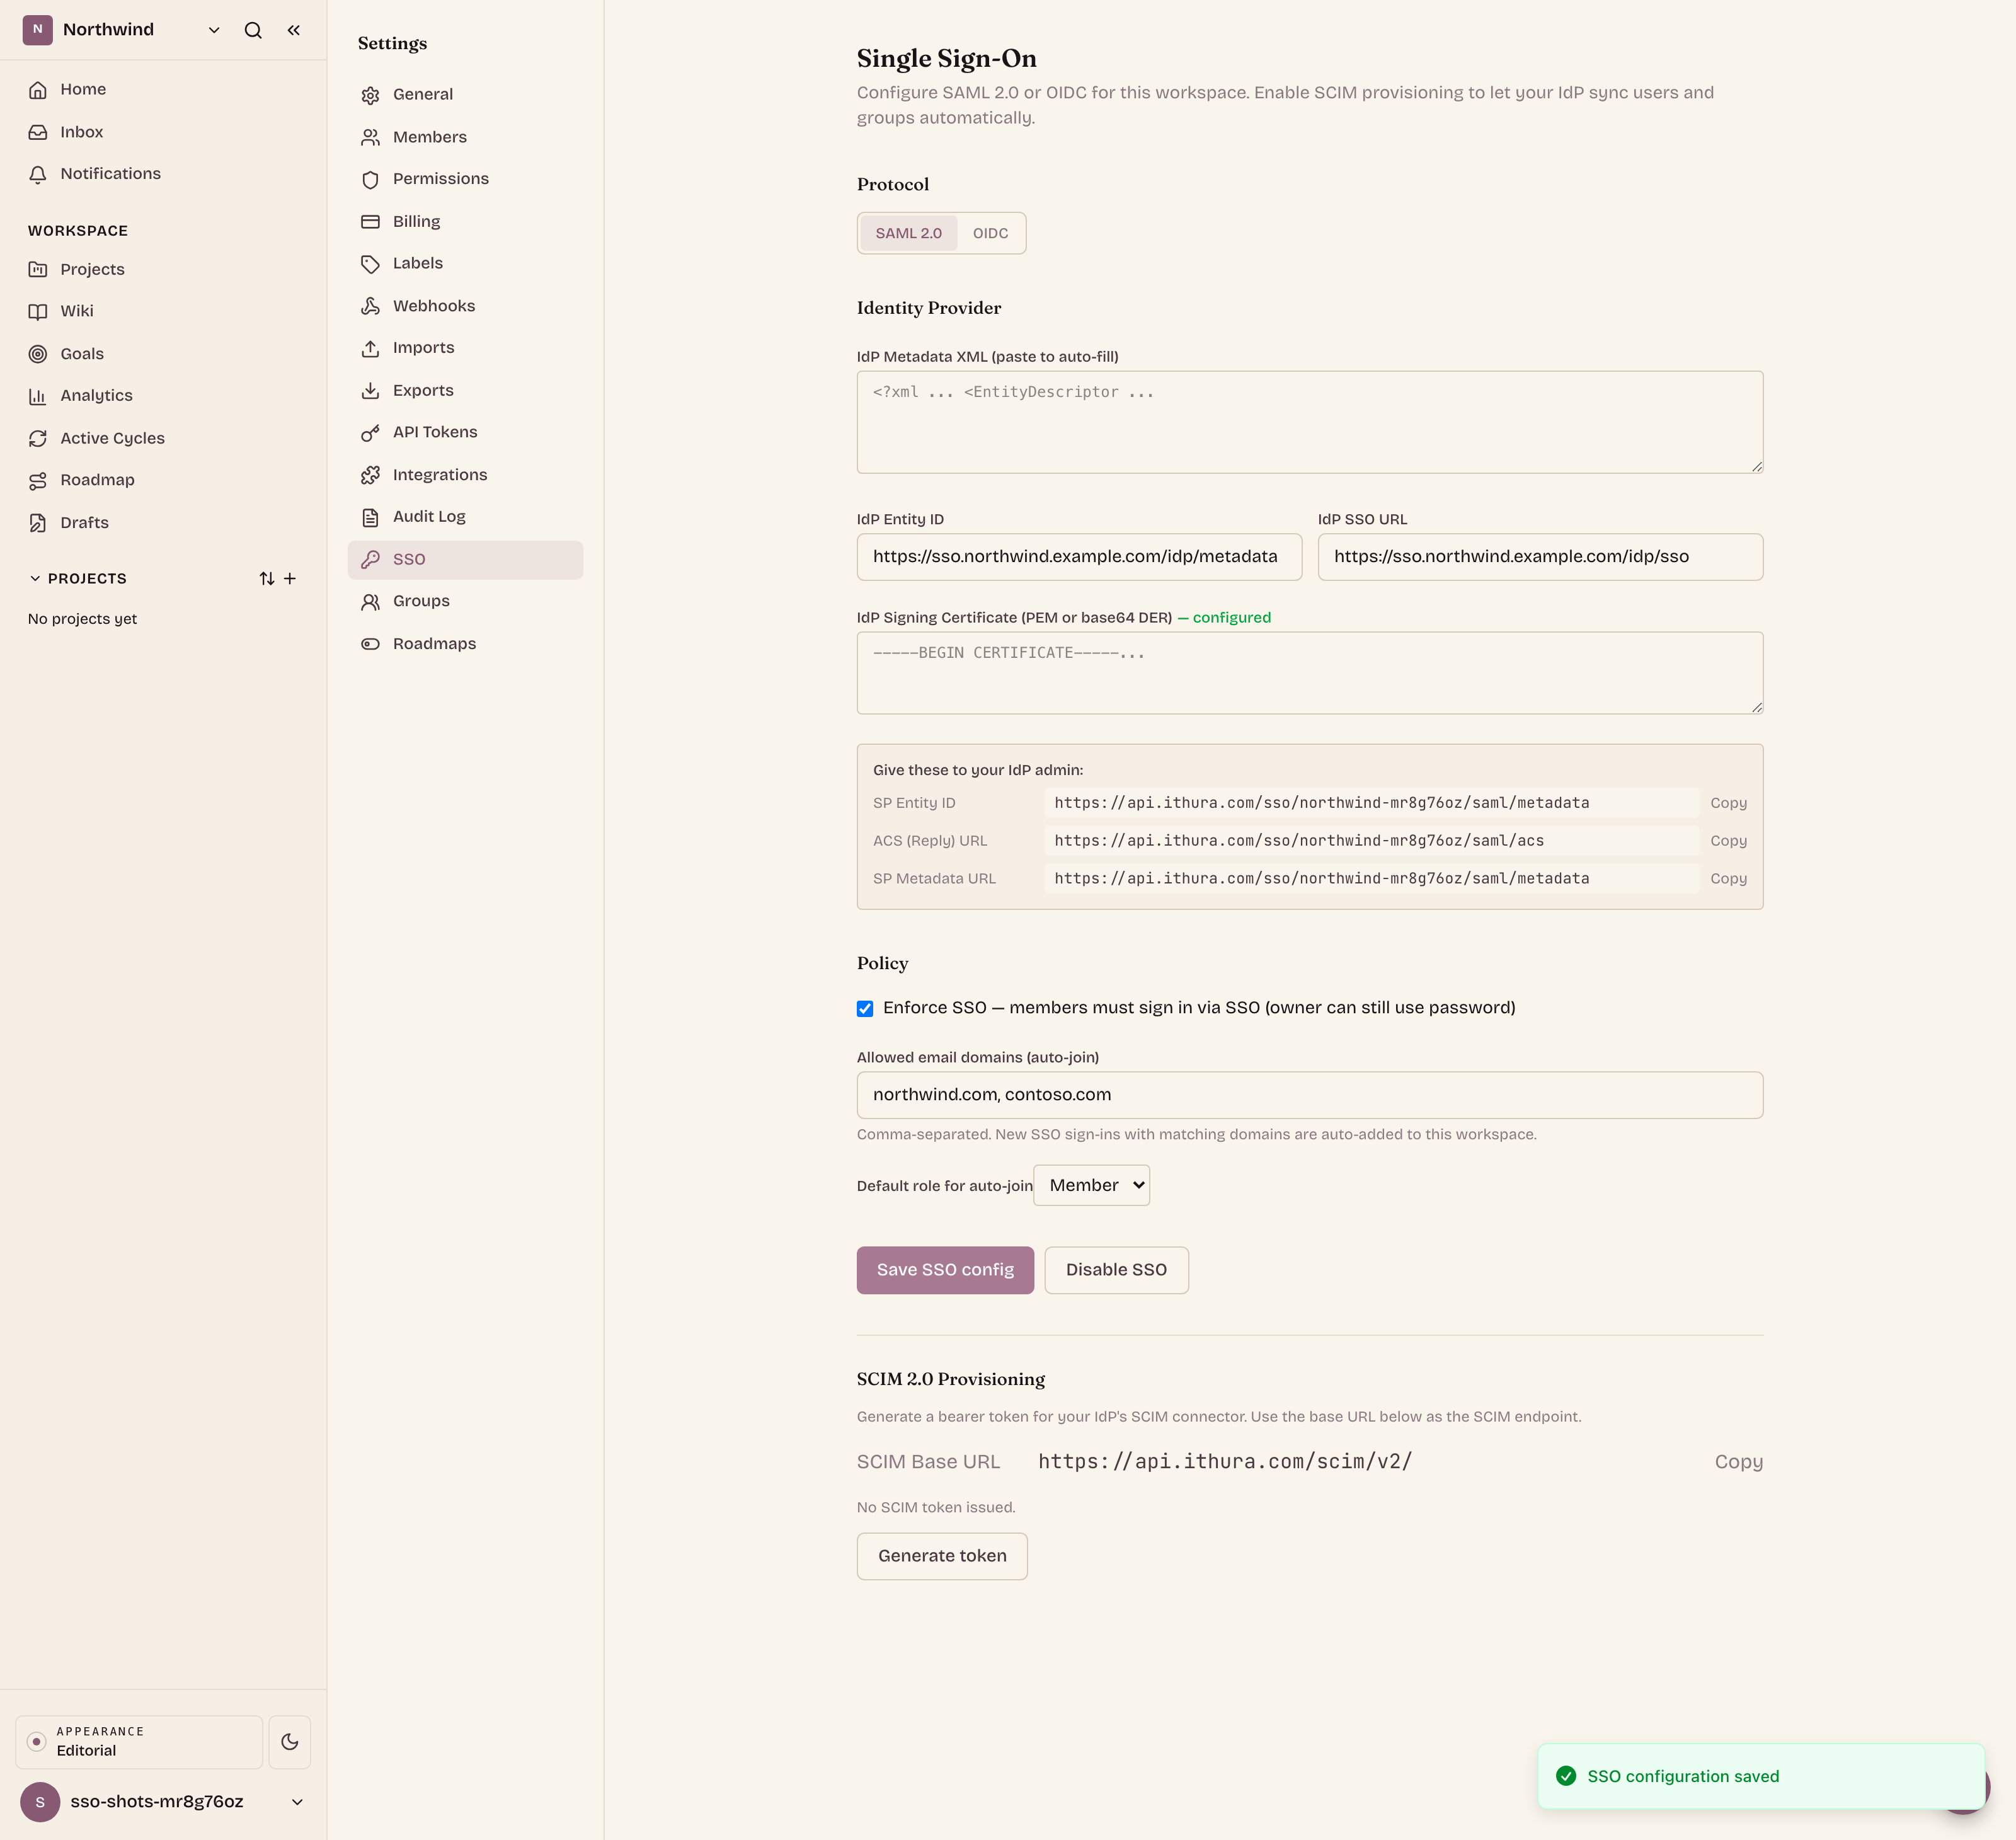
- In Ithura, open
/{workspace}/settings/sso, select the SAML 2.0 protocol, and paste the Okta metadata XML into the IdP Metadata XML box. Ithura parses the entity ID, the sign-on URL, and the signing certificate from it. Save.- If you prefer the individual values, Okta's Sign On tab also lists the Identity Provider Single Sign-On URL (the IdP SSO URL), the Issuer (the IdP Entity ID), and the X.509 Certificate (the IdP Signing Certificate).
The email address in the assertion is what Ithura matches on. Ithura reads the
standard givenname and surname claims for the display name. The Okta
integration sends these by default, so no manual attribute mapping is required.
2. Assign users and set your policy
- In Okta, on the Ithura app's Assignments tab, assign the people or groups who should be able to sign in. Only assigned users can authenticate through this connection.
- In Ithura, on the SSO settings page, choose the Default role for auto-join (the role a user gets in the workspace on first sign-in). Leave Enforce SSO off until you have tested a sign-in.
- Test a sign-in (see SP-initiated SSO below).
Configure SCIM provisioning
SCIM lets Okta push users and groups into your Ithura workspace, so joiners and leavers are provisioned and deprovisioned automatically without a manual invite or removal. SCIM requires the Enterprise plan and an existing SSO configuration.
1. Generate the Ithura SCIM token
- In Ithura at
/{workspace}/settings/sso, scroll to SCIM 2.0 Provisioning. Note the SCIM Base URL:https://api.ithura.com/scim/v2/. - Click Generate token. The full bearer token is shown once. Copy it now: Ithura stores only a hash and a short prefix, so a lost token must be rotated, not recovered.
2. Enter it in Okta
- On the Ithura app in Okta, open the Provisioning tab and click Configure API Integration, then Enable API integration.
- Base URL:
https://api.ithura.com/scim/v2/. The integration sets this for your workspace. - API Token: paste the Ithura SCIM bearer token from the previous step. Okta
sends this value in the HTTP
Authorization: Bearer <token>header on every provisioning call, and it is how Ithura resolves your workspace. It is a workspace secret, not a user attribute. - Click Test API Credentials, then Save.
- Under To App, enable Create Users, Update User Attributes, and Deactivate Users. To sync groups, use Push Groups.
Groups are a single shared list: a group pushed from Okta appears in Ithura under
Settings -> Groups, and a group created there is returned by
GET /scim/v2/Groups, so Okta's "Find groups by name" matches it. Renames and
membership changes flow the same way in both directions.
Attributes Ithura reads
Ithura consumes a small, standard set of SCIM user attributes. Map only these in the Okta profile and leave the rest unmapped:
| SCIM attribute | Used for |
|---|---|
userName | Login identifier (email) |
emails[type eq "work"].value | Work email |
name.givenName | First name |
name.familyName | Last name |
displayName | Display name |
active | Activate or deactivate the membership |
externalId | Stable Okta user id |
Provisioning behavior: creating a user adds a workspace membership at the default
role, creating the underlying Ithura account first if it does not exist. Setting
active to false deactivates the membership; setting it back to true
reactivates it. Deleting a user removes the workspace membership but preserves
the underlying account, since it may belong to other workspaces.
SP-initiated SSO
Members can start sign-in from Ithura, without going through the Okta dashboard first:
- Go to
https://ithura.com/sign-inand click Sign in with SSO. - Enter your workspace name (the slug), then continue. Ithura redirects you to Okta.
- After Okta authenticates you, you land back in your Ithura workspace.
Members can also start from their email: on the sign-in page, entering a work email whose domain belongs to an SSO workspace shows a Continue with SSO prompt. And a user who clicks the Ithura tile on their Okta dashboard is signed straight in (IdP-initiated).
Troubleshoot
"SSO not configured", or an error page after you enter your workspace name.
The workspace name (slug) is wrong, or SAML is not saved on that workspace.
Confirm the slug from your workspace URL and that /{workspace}/settings/sso has
a saved SAML configuration.
Sign-in fails with an assertion or authentication error. The Audience or ACS
URL in Okta does not match Ithura's SP values, or the wrong workspace name was
entered when adding the app. Confirm that the ACS URL is
https://api.ithura.com/sso/<workspace>/saml/acs and the Audience is
https://api.ithura.com/sso/<workspace>/saml/metadata, each with your exact
workspace name.
A user signs in but lands in the wrong workspace, or none. Each connection is scoped to one workspace. Make sure the user is assigned to the Ithura app for the workspace you intend, and that the workspace name in the app matches.
SCIM test credentials fail with 401. The bearer token is wrong or was
rotated. Generate a fresh token in Ithura's SCIM section and paste it into Okta's
Provisioning tab. The token must be sent as Authorization: Bearer <token>.
SCIM changes do not appear in Ithura. Confirm the To-App provisioning
features (Create, Update, Deactivate) are enabled in Okta, and that the user is
assigned to the app. A deactivation arrives as an active = false update.
Enforcing SSO
Once a sign-in works end to end, you can tick Enforce SSO on the Ithura SSO settings page to require SSO for the workspace. Non-owner members can then no longer sign in with a password. The workspace owner is always exempt, so you cannot lock yourself out.
For the broader enterprise security and governance features (two-factor enforcement, IP allowlist, custom roles, and the workspace audit log), see the Enterprise guide.