Enterprise: SSO, SCIM, governance, and audit
This guide covers the workspace security and administration features Ithura ships for larger teams: single sign-on (SAML 2.0), SCIM 2.0 directory provisioning, two-factor enforcement, IP allowlisting, session policy, custom roles, organizations, and the workspace audit log. Every capability here is scoped to a single workspace and is managed by a workspace admin (role 20).
What plan you need
The features below are split across the Pro and Enterprise plans. Check this table before you start so you know what your workspace needs.
Pro includes the security baseline: single sign-on, audit log, custom roles, and two-factor enforcement. Enterprise adds the advanced governance that larger orgs need: SCIM provisioning, network and session controls, organizations, and audit export.
| Capability | Plan |
|---|---|
| SAML single sign-on (including enforced SSO) | Pro |
| Two-factor enforcement | Pro |
| Custom roles | Pro |
| Workspace audit log | Pro |
| Secret projects | Pro |
| SCIM 2.0 user and group provisioning | Enterprise |
| IP allowlist, session policy | Enterprise |
| Organizations | Enterprise |
| Audit CSV export (with filters, streamed) | Enterprise |
| SIEM streaming push and retention controls | Enterprise (coming soon) |
Upgrade or check your current plan at /{workspace}/settings/billing. Every plan
price is published, including Enterprise, no sales call required.
Where a URL below points at the IdP-facing or directory-facing API, it is rooted
at your Ithura API host with no /api prefix. On Ithura Cloud that host is
https://api.ithura.com; on a self-hosted instance it is your own API host. The
exact values are always shown, with copy buttons, on the SSO settings page, so
you never have to construct them by hand.
Single Sign-On (SAML 2.0)
Per-workspace single sign-on. Members authenticate against your identity provider (IdP) instead of an Ithura password. Ithura acts as the SAML service provider (SP); your IdP is the identity provider.
Settings path: /{workspace}/settings/sso. Admin only.
This guide gives the full reference. For a focused, IdP-agnostic walkthrough see the SAML SSO guide, and for click-by-click steps on a specific provider see Okta, Microsoft Entra ID / Azure AD, Google Workspace, or OneLogin.
What it does
- Accepts a SAML assertion from your IdP, then finds or creates the matching Ithura user by email and issues a session.
- Adds anyone who authenticates through this workspace's SSO to the workspace at the default role you pick. Who is allowed to authenticate is controlled on your IdP: only the users you assign to the SAML application can sign in this way.
- Optionally routes work-email sign-ins to this workspace, using an allowed-email-domains list, so a member can start from their email without typing the workspace name. (Cross-workspace auto-join by email domain is a separate feature, verified domains; the allowed-email-domains list here is only for sign-in routing.)
- Optionally enforces SSO so members can no longer sign in with a password, magic link, or social login.
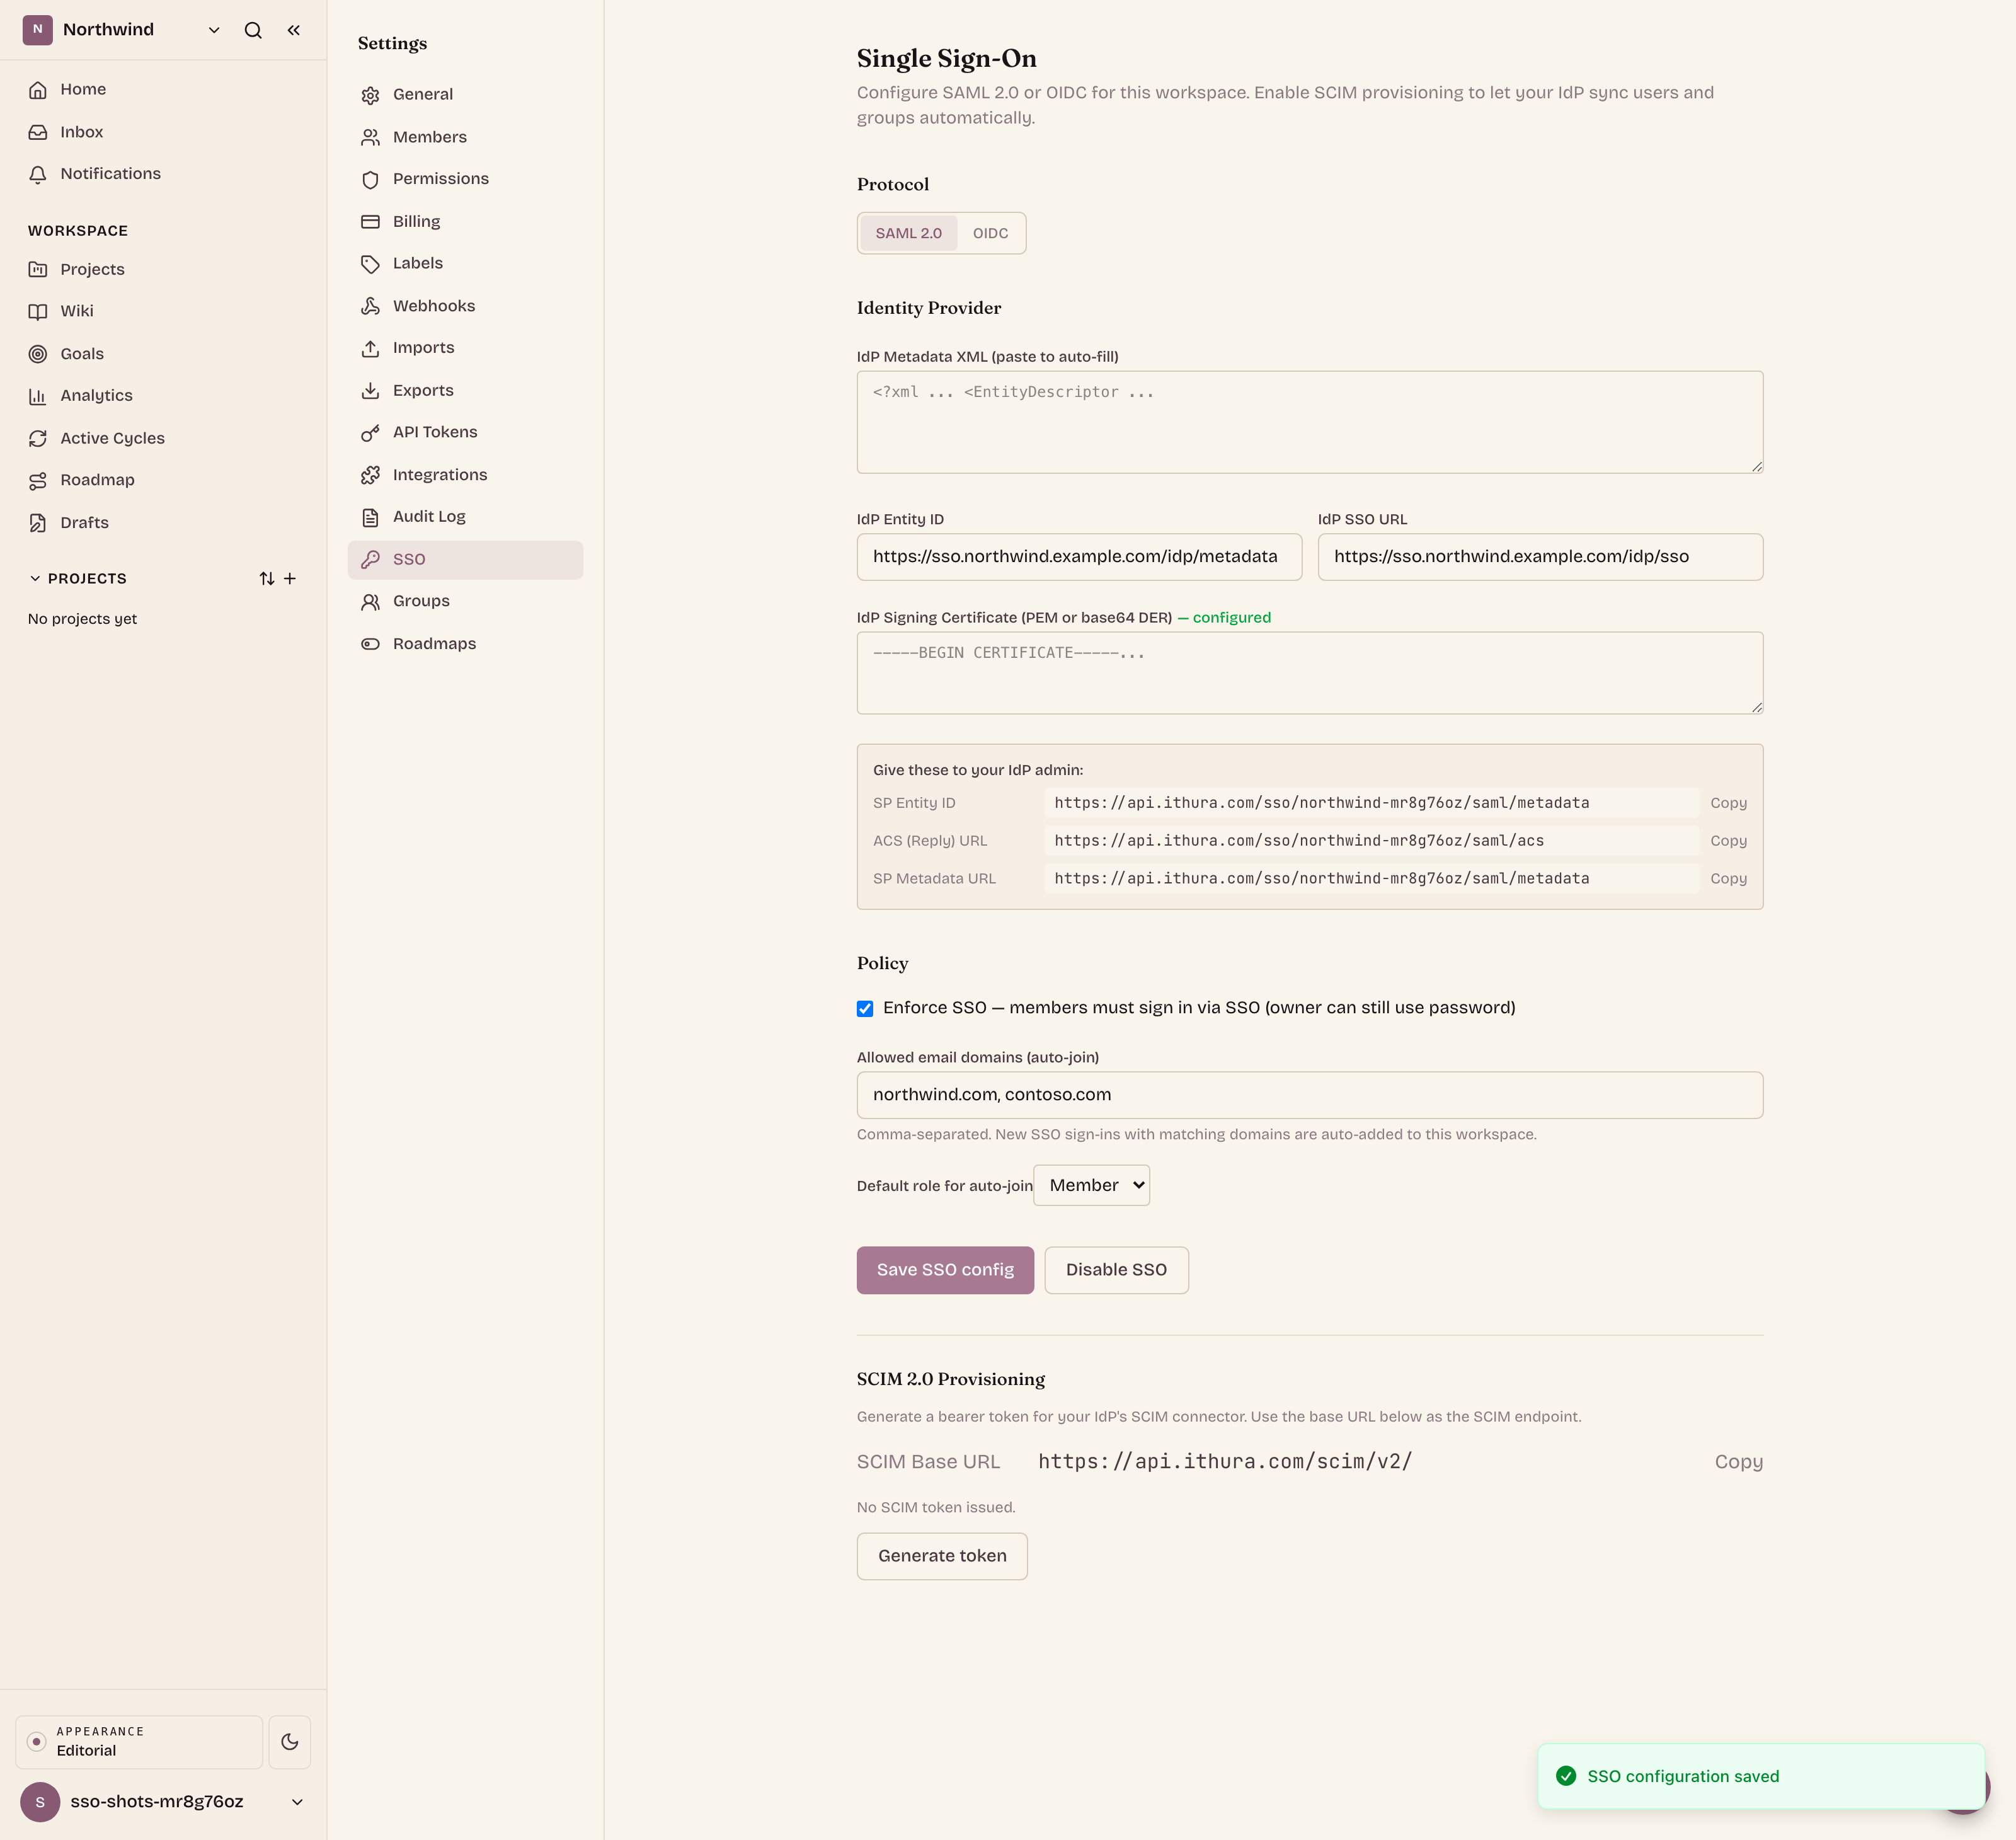
Configure SAML (workspace admin)
- Open
/{workspace}/settings/ssoand select the SAML 2.0 protocol. - Give Ithura your IdP details. The fastest path is to paste your IdP
metadata XML into the "IdP Metadata XML" box: Ithura parses the entity ID,
the SSO URL, and the signing certificate out of it. If you do not have
metadata XML, fill the three fields by hand instead:
- IdP Entity ID
- IdP SSO URL
- IdP Signing Certificate (PEM, or bare base64 DER)
- Save. On the first SAML save, Ithura generates its own SP signing keypair and
then shows you the three values your IdP admin needs. Copy them into your IdP
application:
- SP Entity ID:
https://<api-host>/sso/{workspace}/saml/metadata - ACS (Reply) URL:
https://<api-host>/sso/{workspace}/saml/acs - SP Metadata URL:
https://<api-host>/sso/{workspace}/saml/metadata
- SP Entity ID:
- Point your IdP at the SP metadata URL (or import the three values manually), assign your users to the application, and test a sign-in.
The SP endpoints are public (no Ithura login required), because the IdP and the browser reach them mid-handshake:
GET /sso/{workspace}/saml/loginstarts an SP-initiated sign-in.POST /sso/{workspace}/saml/acsconsumes the IdP assertion.GET /sso/{workspace}/saml/metadatareturns Ithura's SP metadata XML.
Configure Okta (or your IdP)
This is the identity-provider side of the same connection. The example uses Okta, because it is what most teams ask for, but the shape is identical for any SAML 2.0 IdP (Auth0, Microsoft Entra ID / Azure AD, OneLogin, Google Workspace): you create a SAML application, paste in Ithura's SP values, map the email and name claims, assign your users, and then hand Ithura the IdP's metadata.
Keep the Ithura SSO settings page open in another tab. You will copy the SP Entity ID and ACS URL from there into Okta, then copy Okta's metadata back into Ithura.
-
In the Okta Admin Console, go to Applications -> Applications, click Create App Integration, choose SAML 2.0, and click Next.
-
General Settings: set the app name (for example
Ithura). An app logo is optional. Click Next. -
Configure SAML, section A (SAML Settings):
- Single sign-on URL: paste the Ithura ACS (Reply) URL
(
https://<api-host>/sso/{workspace}/saml/acs). Leave "Use this for Recipient URL and Destination URL" checked. - Audience URI (SP Entity ID): paste the Ithura SP Entity ID
(
https://<api-host>/sso/{workspace}/saml/metadata). - Name ID format: choose EmailAddress.
- Application username: choose Email.
- Single sign-on URL: paste the Ithura ACS (Reply) URL
(
-
Configure SAML, section B (Attribute Statements). Ithura reads the signed-in user's email and name from the assertion. Add these attributes using the standard SAML claim names Ithura expects:
Name Name format Value http://schemas.xmlsoap.org/ws/2005/05/identity/claims/emailaddressURI Reference user.emailhttp://schemas.xmlsoap.org/ws/2005/05/identity/claims/givennameURI Reference user.firstNamehttp://schemas.xmlsoap.org/ws/2005/05/identity/claims/surnameURI Reference user.lastNameThe email is the value that matters: Ithura also accepts it straight from the EmailAddress NameID you set in step 3, so the email attribute above is belt and braces. For the display name, Ithura reads the
givennameandsurnameclaims and joins them into the user's name. As an alternative you can send a singlehttp://schemas.xmlsoap.org/ws/2005/05/identity/claims/displaynameclaim mapped touser.displayName. A plainnameclaim is not read, so usegivennameplussurname, ordisplayname. -
Finish the wizard (Next, answer the short feedback question, then Finish).
-
Assign the app to your test users or groups. On the application's Assignments tab, use Assign -> Assign to People (or Assign to Groups) and add the users who should be able to sign in through this connection.
-
On the application's Sign On tab, find Identity Provider metadata. Copy the metadata (either the metadata URL, or the XML itself). If you prefer the three separate values, this tab also lists the Identity Provider Single Sign-On URL, the Issuer, and the X.509 signing certificate.
-
Back in Ithura at
/{workspace}/settings/sso, paste the Okta metadata XML into the "IdP Metadata XML" box (Ithura parses the entity ID, SSO URL, and signing certificate out of it). If you copied the three values instead, fill IdP Entity ID with the Issuer, IdP SSO URL with the Single Sign-On URL, and IdP Signing Certificate with the X.509 certificate. Save. -
Set your policy: choose the Default role for auto-join (the role users get in this workspace), optionally list Allowed email domains so work-email sign-ins route here without a workspace name, and optionally tick Enforce SSO (leave it off until the connection is proven). Then test a sign-in.
-
Optional, for the dashboard tile. Okta shows the app as a tile on each assigned user's Okta dashboard; clicking it signs them straight into Ithura (IdP-initiated, no workspace name required). To deep-link the tile to a specific page, set the application's Default Relay State (on the Sign On tab) to a same-site path such as
/{workspace}/projects. Ithura ignores any Relay State that is not a same-site relative path.
For any other IdP, the steps map one to one: create a SAML app, set the Single sign-on / ACS URL and the Audience / SP Entity ID from Ithura, use the EmailAddress NameID plus the email and name claims above, assign users, and give Ithura the IdP metadata.
Enforced SSO
Tick "Enforce SSO" to require SSO for the workspace. Once enforced, a non-owner
member can no longer complete a password, magic-link, or social OAuth
sign-in: each returns an SSO_REQUIRED result for that user, so the only way in
is through your IdP. The check runs at authentication time and fails closed. The
workspace owner is always exempt, so an admin cannot lock themselves out. Leave
this off while you are still testing the connection.
Exemption is per workspace: a user who owns one enforced workspace but is a non-owner member of another enforced workspace is still required to use SSO because of that second membership. Enabling Enforce SSO does not delete existing passwords or revoke live sessions; it only gates new sign-ins.
Workspace membership and auto-join
Two things happen when a user signs in through SSO, and it helps to keep them apart.
First, the workspace whose SSO they used. Anyone who successfully authenticates through this workspace's SSO is added to the workspace (if not already a member) at the "Default role for auto-join" you pick (Guest, Member, or Admin). This is not gated by the domain list: the gate is your IdP, where you assign the SAML application only to the people who should have access. Leave the connection unassigned for users you do not want in the workspace.
Second, sign-in routing. Under Policy you can list "Allowed email domains"
(comma-separated, for example acme.com, partner.com). This list is only used to
route a work-email sign-in to this workspace: when a member types an email whose
domain is on the list, the sign-in page offers "Continue with SSO" without asking
for the workspace name. It is admin-typed and unverified, and it does not add
anyone to any workspace on its own.
Cross-workspace auto-join by email domain is a separate, DNS-verified feature, not this list. If you want people to be added to a workspace automatically by their email domain, verify the domain under Verified domains, which proves ownership with a TXT record and then auto-joins users with a verified email at that domain.
How members sign in
Once a connection exists, members can reach it three ways, and all of them land in the same place:
- By email, with no workspace name needed. On the sign-in page a member types their work email; if its domain is registered for an SSO workspace, Ithura shows a "Continue with SSO" prompt and sends them to your IdP. If that workspace enforces SSO, the password field is hidden entirely. Only the email domain is sent to the lookup, never the full address. Add the member's domain to "Allowed email domains" for this routing to trigger (it only routes sign-in; it does not join anyone to a workspace).
- "Sign in with SSO", then the workspace name, for members who prefer it or whose domain is not on the allowlist. This is the SP-initiated flow.
- From your IdP dashboard. A user who clicks the Ithura tile in Okta (or any IdP) is signed straight in; see the Default Relay State note in the Okta steps above to deep-link the tile to a specific page.
A note on OIDC
The SSO settings page also exposes an OIDC option (issuer, client ID, client secret), and Ithura stores that configuration. The sign-in flow that is wired end to end today is SAML: there is no OIDC login or callback route yet, so selecting OIDC saves the config but does not enable an OIDC sign-in. Use SAML for a working connection. This will be documented here when the OIDC flow ships.
Plan: SAML SSO, including enforced SSO, is included on the Pro plan.
SCIM 2.0 provisioning
SCIM lets your IdP push users and groups into the workspace directly, so joiners and leavers are provisioned and deprovisioned without a manual invite or removal in Ithura. Direction is inbound: your IdP is the source of truth.
Where to get the base URL and token: the SCIM section at the bottom of
/{workspace}/settings/sso. You must configure SSO first; SCIM cannot be enabled
on a workspace with no SSO config.
Set it up (admin)
- Configure SAML SSO for the workspace (above).
- In the "SCIM 2.0 Provisioning" section, note the SCIM Base URL:
https://<api-host>/scim/v2/. - Click "Generate token" to issue a bearer token. The full token is shown once and never again. Copy it immediately. Only a SHA-256 hash and a short prefix are stored, so a lost token must be rotated, not recovered.
- In your IdP's provisioning connector, set the SCIM base URL and paste the token as the bearer token.
- Use "Rotate token" to replace the token (the old one stops working) or "Revoke token" to disable SCIM entirely.
Endpoints
Authentication is Authorization: Bearer <scim_token>, which uniquely resolves
the workspace. All endpoints are under https://<api-host>/scim/v2/:
- Discovery (unauthenticated per the SCIM spec):
/ServiceProviderConfig,/ResourceTypes,/Schemas. - Users:
GET /Users,POST /Users,GET /Users/{id},PATCH /Users/{id},DELETE /Users/{id}.GET /Userssupports theuserName eq "..."filter andstartIndex/countpaging. - Groups:
GET /Groups,POST /Groups,GET /Groups/{id},PATCH /Groups/{id},DELETE /Groups/{id}. Group PATCH supports add member, remove member, and rename.
Provisioning behavior: creating a SCIM user adds a workspace membership at the
workspace default role, creating the underlying Ithura user account first if it
does not exist. A PATCH that sets active to false deactivates the membership;
setting it back to true reactivates it. Deleting a SCIM user removes the
workspace membership but preserves the underlying account, since it may belong
to other workspaces. SCIM groups map to workspace groups and their members.
Plan: SCIM provisioning requires the Enterprise plan.
Governance
Governance settings are per workspace. They are enforced on every request into the workspace, not just at sign-in, by a workspace governance gate. The workspace owner bypasses the IP allowlist and the 2FA gate so they cannot be locked out.
Backend settings live at GET / PATCH /workspaces/{workspace}/security/
(admin only for changes). The controls are:
require_2faip_allowlist(a list of CIDRs)session_max_hours(hard session lifetime; default 720, which is 30 days)session_idle_max_minutes(idle timeout; 0 disables it)
Note on the admin screen: the Security and governance settings and the Custom
roles editor are served by working API endpoints and have React components
(SecuritySettings, CustomRolesSettings), but those two screens are not yet
linked into the workspace settings navigation. Until they are, drive these
settings through the endpoints listed here. Everything below is live on the
backend.
Two-factor enforcement
When require_2fa is on, any non-owner member of the workspace must have
enrolled in TOTP two-factor and must have verified the second factor for their
current session before they can use the workspace. If they have not enrolled,
the request is refused with a pointer to the enrolment flow; if they have
enrolled but not verified this session, they are pointed to verification.
Members manage their own 2FA through these endpoints:
POST /users/me/2fa/enroll-start/returns a TOTP secret and anotpauth://URI to render as a QR code.POST /users/me/2fa/enroll-confirm/verifies the first code, marks the user enrolled, and returns ten single-use backup codes (shown once).POST /auth/2fa-verify/verifies a TOTP or backup code for the current session.POST /users/me/2fa/disable/removes enrolment after a password re-check.
Plan: two-factor enforcement is included on the Pro plan.
IP allowlist
Set ip_allowlist to one or more CIDR ranges (for example 203.0.113.0/24).
Once the list is non-empty, requests into the workspace from an IP outside every
range are refused, except for the workspace owner. Invalid
CIDRs are rejected at save time, so you cannot store a malformed range. An empty
list means no IP restriction.
Plan: IP allowlist and session policy require the Enterprise plan.
Custom roles
Custom roles let an admin define a named role between Member and Admin with a specific set of permission keys, then assign it to individual members. This grafts onto the built-in roles (Guest 5, Member 15, Admin 20) rather than replacing them: a custom role carries a base role plus a permissions list, and admins always hold every permission implicitly.
Endpoints (admin only):
GET /workspaces/{workspace}/custom-roles/lists roles.POST /workspaces/{workspace}/custom-roles/creates a role (name, optional description, base role of 5/15/20, and a list of permission keys). Names must be unique within the workspace.PATCH /workspaces/{workspace}/custom-roles/{roleID}/updates name, description, or permissions.DELETE /workspaces/{workspace}/custom-roles/{roleID}/removes a role.PATCH /workspaces/{workspace}/members/{memberID}/custom-role/assigns (or clears) a member's custom role.GET /workspaces/{workspace}/me/permissions/returns the caller's effective permission keys.
The catalogue of assignable permission keys is available at
/users/me/api-tokens/scopes/ and via the permission-key endpoint the roles
editor uses. Only recognized keys are stored; unknown keys are dropped.
Plan: custom roles are included on the Pro plan.
Organizations
Organizations are a governance layer above workspaces: one organization groups several workspaces so you can administer them together. The creator becomes the first organization admin.
Endpoints:
POST /organizations/andGET /organizations/create and list.GET/PATCH/DELETE /organizations/{orgID}/read, rename, and delete.GET/POST /organizations/{orgID}/members/andDELETE /organizations/{orgID}/members/{userID}/manage org membership.GET /organizations/{orgID}/workspaces/lists the workspaces in the org.POST /workspaces/{workspace}/move/moves a workspace into or out of an org.
Plan: organizations require the Enterprise plan.
Audit log
A workspace-wide, append-only trail of administrative and configuration changes. Admin only.
Settings path: /{workspace}/settings/audit-log. Backend:
GET /workspaces/{workspace}/audit-logs/.
What is captured
Each entry records the actor (a user or an API token, with a display label), the action, the entity type and entity ID it touched, free-form metadata, the client IP address, the user agent, and the timestamp. Expanding a row in the UI reveals the full metadata JSON and the user agent.
The actions currently emitted cover the sensitive surface of a workspace:
- Workspace: settings updated, permissions updated.
- Membership: member invited, added, role changed, removed; invite accepted, invite revoked.
- Projects: created, deleted, archived, unarchived; project member added, role changed, removed.
- Integrations: installed, removed.
- API tokens: created, revoked.
- Billing: checkout created.
Filtering and export
The log view filters by action, entity type, actor user ID, and a from/to date range, and pages with a keyset cursor (most recent first). "Export CSV" downloads the currently loaded rows as an RFC 4180 CSV with columns for timestamp, actor, actor email, action, entity type, entity ID, IP address, and metadata.
Plan: the audit log is included on the Pro plan. CSV / SIEM export and retention controls are an Enterprise capability (coming soon).
Troubleshooting
SAML sign-in fails with "SAML assertion invalid." The IdP's assertion did not verify against the signing certificate Ithura has. Re-import your IdP metadata (or re-paste the signing certificate) on the SSO settings page, and confirm the IdP is signing the assertion with the certificate you gave Ithura. Certificate rotations on the IdP side must be re-saved in Ithura.
"SAML assertion missing email/NameID." Ithura needs an email to find or
create the user. Configure your IdP to send the email address as the NameID (in
EmailAddress format) or as an email attribute in the assertion.
A user cannot sign in after you enforced SSO. That is expected: enforced SSO
returns SSO_REQUIRED for non-owner members on password, magic-link, and social
sign-ins alike. They must sign in through the IdP. Only the workspace owner keeps
password access.
An SSO user was not added to the workspace. Membership in the workspace whose SSO they used is granted whenever the assertion succeeds, so a missing membership means the sign-in itself did not complete: confirm the user is assigned to the SAML application on your IdP, and check the SSO settings page for the sign-in error. The "Allowed email domains" list does not add anyone to a workspace; it only routes work-email sign-ins. For automatic cross-workspace joining by email domain, use Verified domains.
SCIM connector returns 401. The bearer token is wrong, was rotated, or was revoked. Generate a fresh token on the SSO settings page and paste it into the connector. Remember the full token is shown only once at issue time.
"Configure SSO before enabling SCIM." SCIM is keyed to a workspace's SSO config. Save a SAML configuration first, then generate the SCIM token.
SCIM user filter returns nothing. Only the userName eq "value" filter is
supported, matching on email. Other filter expressions are ignored.
Locked out by the IP allowlist. The workspace owner is never blocked by the
allowlist, so sign in as the owner and correct or clear the
ip_allowlist. Save only valid CIDRs; a malformed range is rejected at save
time.
A member is stuck on a 2FA prompt. With require_2fa on, the member must
both enrol in TOTP and verify the second factor for the current session. If they
lost their authenticator, they can use a backup code at verification, then
re-enrol.