Boards
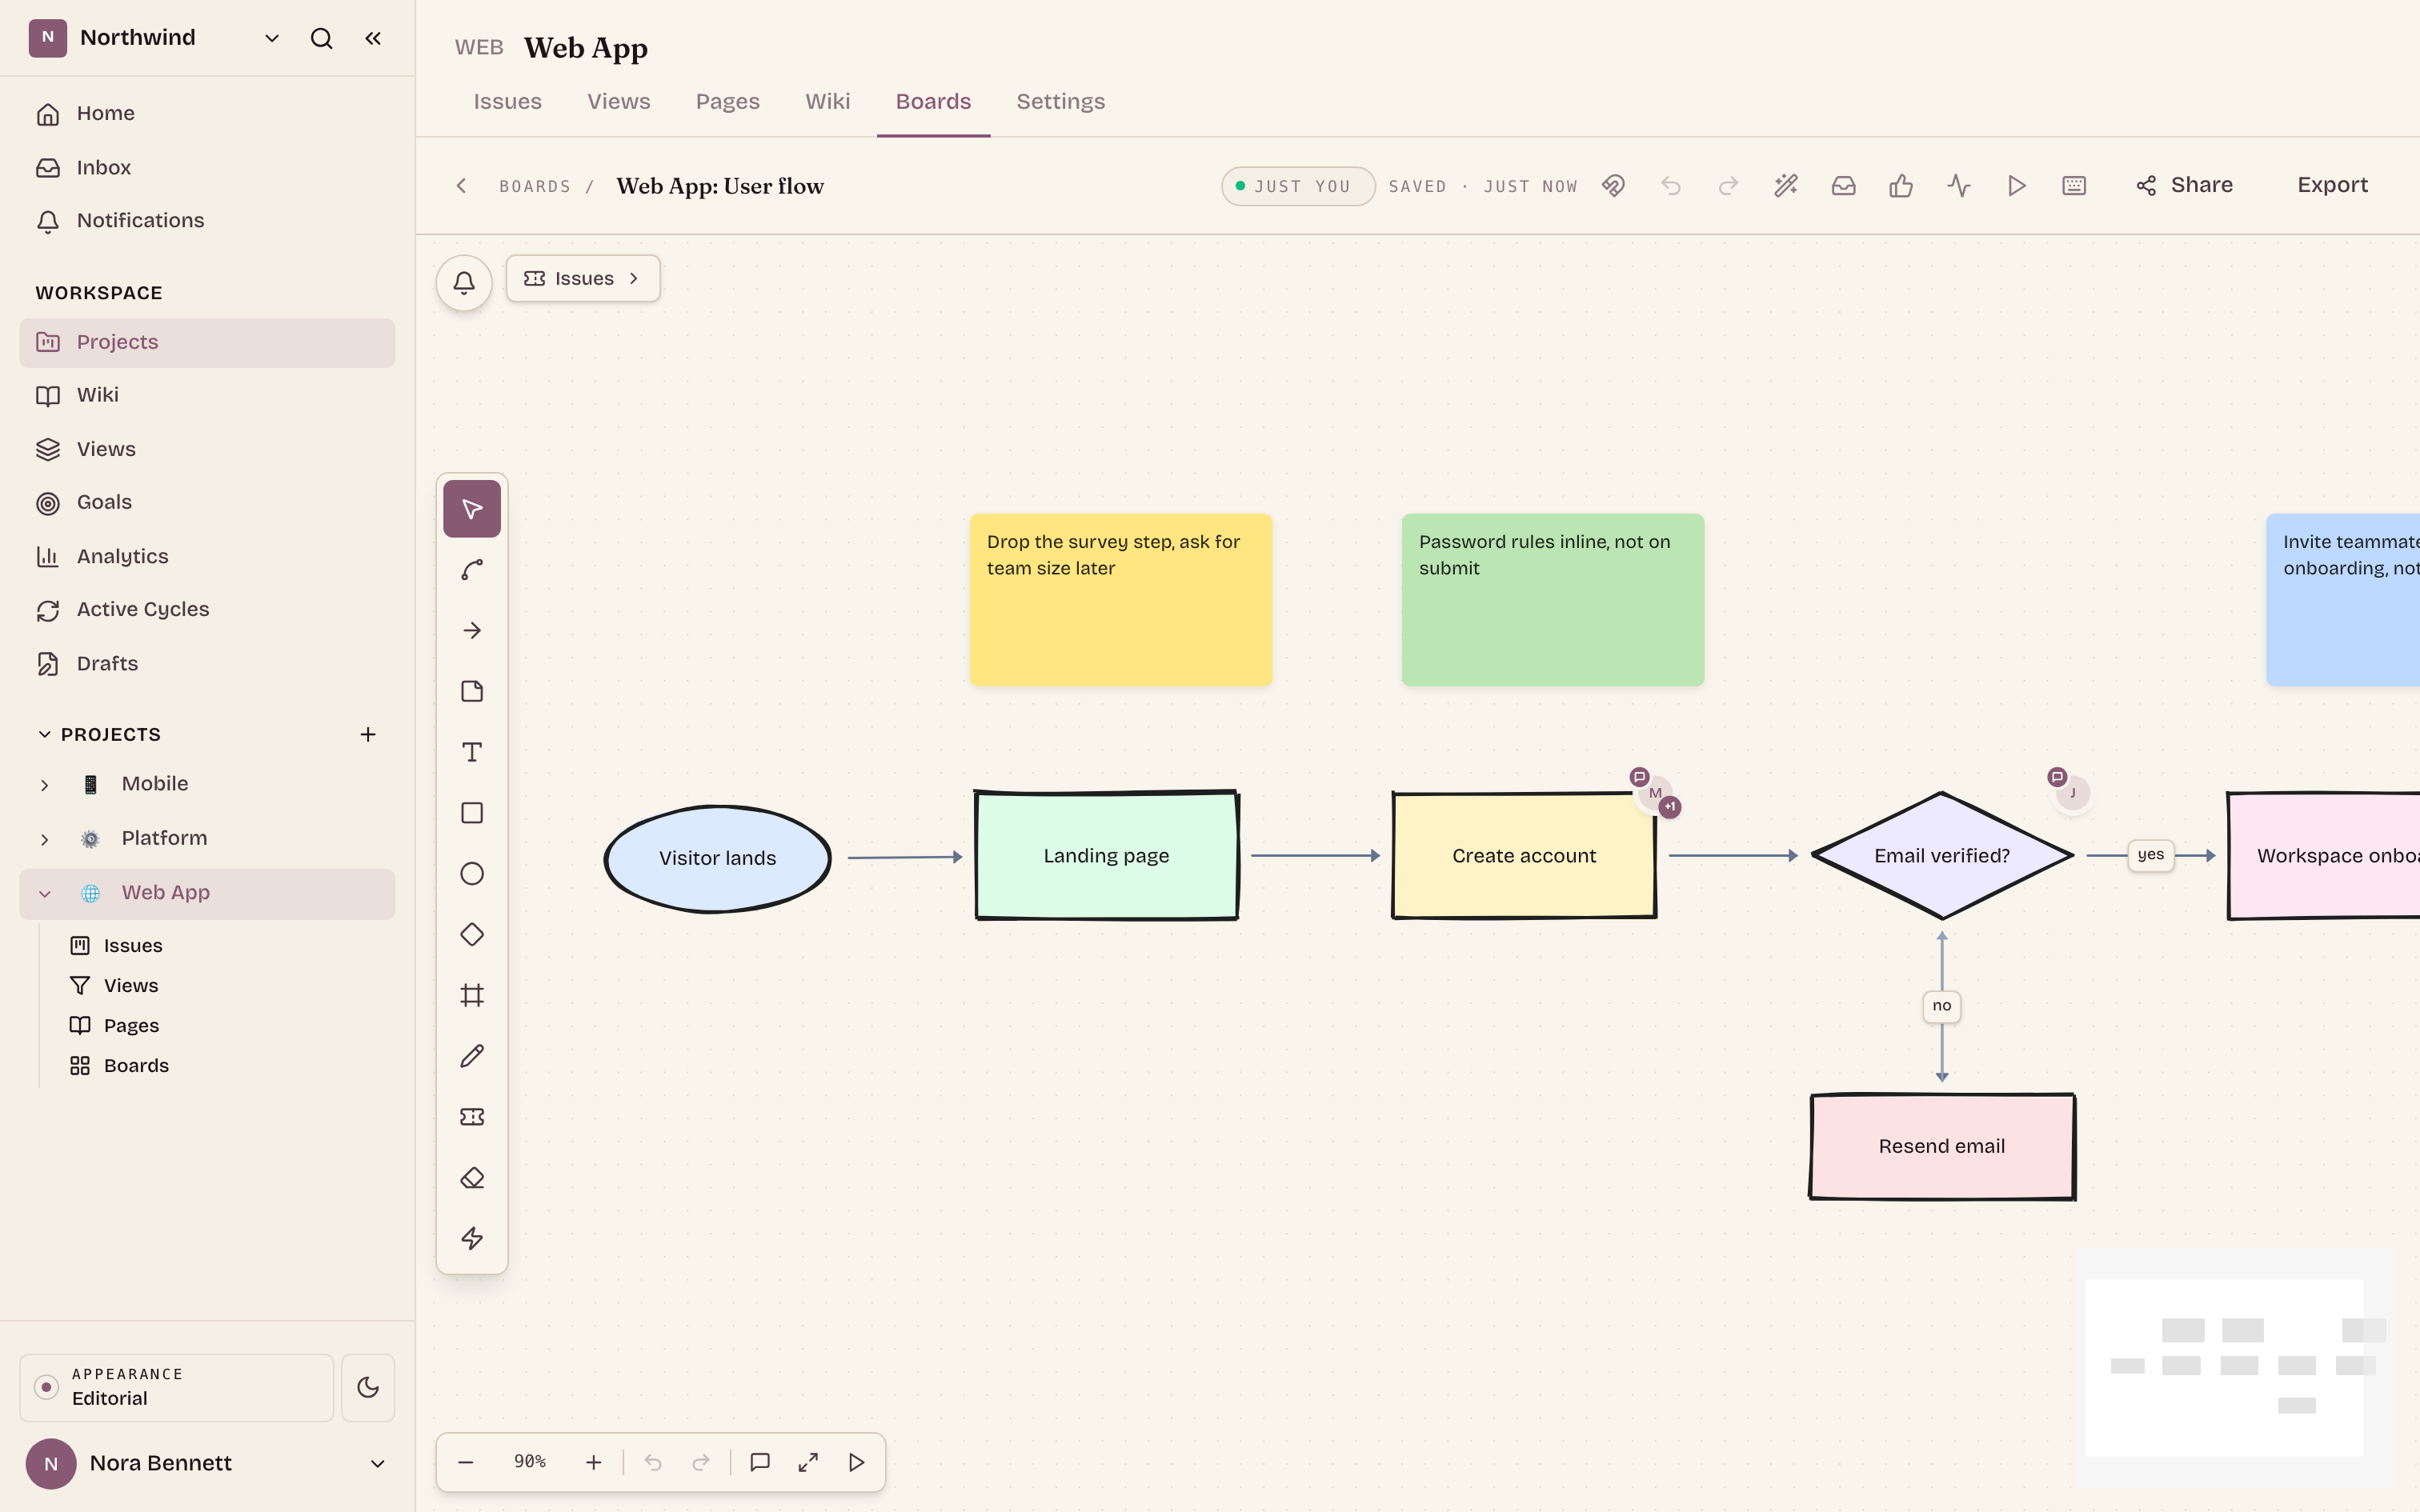
Boards are infinite-canvas whiteboards for diagrams, planning, and workshops. They are multiplayer by default: everyone who opens the same board sees each other's cursors, selections, and edits in real time. You can drop sticky notes, text, shapes, arrows, freehand drawings, images, frames, and issue cards onto a shared canvas, discuss it in node-anchored comment threads, present it as slides, and share the result read-only with people outside the workspace.
What it does
- Gives each project an infinite pan-and-zoom canvas with sticky notes, text, shapes (rectangle, ellipse, diamond), arrows and connectors, freehand pen strokes, images, frames, and issue cards linked to real issues.
- Runs multiplayer by default. Edits sync through a shared live document, cursors and selections broadcast over a presence channel, and everything autosaves continuously. There is nothing to switch on.
- Anchors threaded comments to individual elements, with @mentions, emoji reactions, resolve, a board-wide inbox, and copyable thread permalinks.
- Presents the board as slides, in reading order or a curated sequence, with dark mode and fullscreen toggles.
- Groups boards into collections, searches text across every board in the project, and exports to PNG, SVG, PDF, Markdown, or JSON.
- Publishes a board as a read-only public link for viewers who do not have an Ithura account.
Where boards live
Boards belong to a project. Open a project and go to its Boards tab
(/{workspace}/projects/{projectId}/boards). That page is the board index: a
grid of cards with thumbnails, plus a collections sidebar and a search field.
Opening a board takes you to the editor at
/{workspace}/projects/{projectId}/boards/{boardId}.
Boards can also be embedded inside wiki pages as workspace-owned boards. Those reuse the same editor but hide the project-scoped panels (comments, activity history, sharing, the issue palette, and image upload). They are created and edited from the wiki page, not from the project Boards tab.
Create a board
- Open the project's Boards tab.
- Click New board.
- Pick a template, adjust the pre-filled name, and click Create board.
Templates give you a starting layout; you can change everything after:
| Template | Starting point |
|---|---|
| Blank | Empty canvas |
| Flowchart | Start, step, decision, outcome |
| Mind-map | Central topic with four branches |
| Retro | Four columns: Mad, Sad, Glad, Action |
| Brainstorm | Nine empty stickies on a 3x3 grid |
| System design | Client, gateway, services, datastores |
The new board opens straight into the editor. From the index you can also Duplicate an existing board (hover a card for the action buttons) to start from a copy, or Delete one.
The toolbar
A vertical toolbar floats on the left edge of the editor. Placement tools show a dashed ghost outline under the cursor previewing the element before you click to drop it; after placing, the toolbar returns to Select. The Pen stays armed so you can draw several strokes in a row.
| Tool | Key | What it does |
|---|---|---|
| Select | V | Select, move, resize, box-select |
| Connect | C | Click a source node, then a target, to create an edge. The source stays armed so you can chain edges from it; Esc or a click on empty canvas cancels |
| Arrow | A | Drag anywhere on empty canvas to drop a standalone arrow; endpoints snap to nodes |
| Sticky | S | Drop a sticky note |
| Text | T | Drop a text label |
| Rectangle | R | Drop a rectangle shape |
| Ellipse | (none) | Drop an ellipse shape |
| Diamond | (none) | Drop a diamond shape |
| Frame | F | Drop a frame (a titled region that groups elements) |
| Pen | P | Freehand drawing; each stroke becomes a movable element |
| Issue | I | Arm the issue tool; issue cards are usually added by dragging from the issue palette |
| Eraser | E | Swipe to delete anything under the cursor, with a fading trail |
| Laser | L | A fading red pointer trail for presentations; changes nothing |
Elements and editing
- Sticky notes: double-click to edit the text; single click selects, drag moves. Peers see your typing in near real time. Stickies also carry votes (see below).
- Text: a transparent label. Double-click to edit the text in place; drag the handles to resize.
- Shapes: rectangle, ellipse, or diamond, with text centered inside. Shapes have a hand-drawn look by default and a full style system in the properties bar (see below). The outline color follows the theme so shapes stay visible on a dark canvas.
- Frames: dashed, titled regions that sit behind other elements. Dropping an element onto a frame parents it to the frame, so dragging the frame moves everything inside it. Dragging an element out of the frame releases it.
- Freehand strokes: drawn with the Pen; each stroke is stored as one element you can select, move, and delete.
- Images: paste an image from the clipboard anywhere on the canvas. It appears immediately and uploads in the background (an "uploading" badge shows while that runs; a failed upload keeps the image visible locally but it will not survive a reload on another device). Image resize keeps the aspect ratio.
- Issue cards: open the issue palette and drag an issue onto the canvas. The card shows the issue's identifier, title, and priority, live from the project, and has an open-in-new-tab button to jump to the issue.
Hovering or selecting an element shows a small floating toolbar above it with vote, react (emoji), comment, duplicate, delete, and lock. Locking makes an element non-draggable (it stays selectable so you can unlock it again). A Top votes panel in the header ranks the most-voted stickies, which makes dot-voting workshops one click.
Selecting a single element also opens the inspector on the right, where you can edit its text or properties, change stacking order, lock it, or jump to its comments.
Arrows and connections
Edges are "floating" by default: the line attaches to the nearest point on each element's border and slides along it as the elements move, with a small breathing gap so the arrowhead never touches the shape.
Ways to create a connection:
- Connect tool (
C): click a source element, then a target. The source stays armed so you can fan out several edges from it. Esc or clicking empty canvas cancels. Frames and pen strokes cannot be endpoints. - Drag from an element's border: drag out of any side of an element and release on another element.
- Arrow tool (
A): drag on empty canvas to draw a standalone arrow that is not attached to anything. Its two endpoints are tiny grab dots (visible on hover or selection). Drop an endpoint onto an element and the arrow attaches to it; drag the arrow's body to move the whole arrow at once.
Editing a connection:
- Select the edge (click anywhere near the line; selected edges float above elements so they keep the pointer). Two dots appear at the endpoints. Drag a dot to detach that end from its element; release over another element to re-attach, or release on empty canvas to leave it free-floating.
- Edge inspector: with an edge selected, a panel offers the line type (Float, F-curve, Straight, Curve, Arc, Soft, Step), start and end arrowheads (none, open, solid), and an animated-dashes toggle.
- Label: double-click an edge to add or edit its label (for example "depends on").
- You can create as many edges as you want between the same two elements.
The properties bar
Selecting elements opens a floating properties deck. It docks to the bottom-left of the canvas by default; drag its grip handle to move it to any edge, or double-click the grip to cycle sides. The controls are grouped behind icon buttons (Colors and shape, Stroke and fill, Text, Arrange) that open a small flyout, and the set of groups adapts to the selection:
- Any selection: stacking order (bring to front, bring forward, send
backward, send to back). To delete, use the element's hover toolbar or the
Deletekey. - Stickies: seven pastel color swatches, plus a full color picker, a HEX input (commits on Enter or blur), an eyedropper to pick a color from the screen (on browsers that support it), and your six most recent colors.
- Shapes: everything stickies get, plus shape switcher (rectangle, ellipse, diamond), sloppiness (Architect for crisp lines, Artist for hand-drawn, Cartoonist for heavy sketch), fill style (solid, hachure, cross-hatch, zigzag, dots), stroke style (solid, dashed, dotted), stroke width (thin, medium, thick), corner radius for rectangles (sharp or rounded), and an opacity slider (10 to 100 percent).
- Text (stickies, shapes, or text labels): text alignment (left, center, right), four font sizes (S, M, L, XL), a text color, and a font family (sans, serif, or mono).
- Two or more selected: align left, horizontal center, right, top, vertical center, bottom. With three or more, distribute horizontally or vertically (equalizes the gaps).
With a sticky or shape selected, the keys Q through P pick palette colors
1 to 10 directly from the keyboard.
Precision helpers
- Alignment guides: while dragging, dashed guide lines appear whenever an
element's edges or center line up with another element's. Hold
Shiftwhile dragging to snap onto the guide. - Snap to grid: the magnet button in the header toggles an 8px grid snap.
- Nudge: arrow keys move the selection 1px;
Shift+ arrow moves 10px. - Auto-arrange: the wand button in the header lays out connected elements automatically.
- Navigation: scroll or two-finger swipe pans the canvas in any direction;
pinch to zoom, or hold
Cmd/Ctrlwhile scrolling to zoom.Space+ drag also pans. The bottom-left control bar shows the zoom percent (click it to reset to 100 percent, double-click to fit the whole board), plus zoom in and out, undo and redo, the comments inbox, fit to content, and present. A minimap sits bottom-right.
Comments
Comments are anchored to elements, so feedback lands exactly where it applies. Wiki-embedded boards do not have comments; project boards do.
- Start a thread: select an element and click the comment button in its hover toolbar (or the inspector). A popover opens next to the element and follows it as you pan and zoom. On narrow screens it becomes a bottom sheet.
- Threads and replies: each root comment is a thread; replies nest under
it. Send with the send button or
Cmd/Ctrl+Enter. - @mentions: type
@to get a picker of project members, filtered as you type; arrow keys and Enter to choose. Mentions are highlighted in the rendered comment. - Reactions: react to any comment with a quick emoji row; counts are shown per emoji and your own reactions are highlighted (click again to remove).
- Resolve: resolve a thread from its check button; resolved threads are hidden by default and can be brought back with the "Show resolved" toggle. Resolving is reversible (Re-open).
- Avatar pins: an element with comments wears the last commenter's avatar on its corner, with a count of further comments. Click the pin to open the thread.
- Inbox: the inbox button in the header (or the bottom control bar) lists every thread on the board with author, age, snippet, reply count, and resolved state, sortable newest or oldest first. Click a thread to jump the camera to its element and open the conversation. "Mark read" clears unread state for the board.
- Permalinks: each comment's overflow menu has Copy link. The link
appends
?thread=<id>to the board URL; opening it centers the camera on the anchoring element, opens the thread, and briefly highlights the comment.
Live collaboration
Multiplayer is always on. When more than one person has the same board open:
- You see each other's live cursors, labelled and color-coded per person.
- You see what others have selected: a colored outline with a small "name editing" tag on the element.
- Edits merge in real time through a shared live document (a CRDT), so concurrent changes from several people combine instead of overwriting each other.
The header shows a presence pill: "Just you" or "N editing" with avatars, and a green dot while the live connection is up. Multiple tabs from the same person count once.
Everything autosaves. Edits are saved automatically moments after you stop
changing things; the header shows "Saving" and then "Saved" with a timestamp.
Closing the tab or navigating away mid-edit still flushes the pending save, so
you do not lose the last change. Undo and redo (buttons in the header and the
bottom bar, or Cmd/Ctrl + Z and Cmd/Ctrl + Shift + Z) cover your
own edits. Project boards also keep an Activity history panel, opened from
the header.
Presentation mode
Click the play button (header or bottom control bar) to present. The camera animates from element to element as slides; editor chrome gets out of the way.
- Advance with
→orSpace, go back with←, or use the on-screen arrows.Escexits. - By default slides follow reading order (top to bottom, left to right), skipping frames and pen strokes.
- Curated sequence: on any slide, click Add to put it in a curated sequence; once a sequence exists it drives the slide order instead. A strip shows the sequence so you can jump, reorder, or remove slides. The sequence is saved with the board.
- The control pill also has a dark-mode toggle and a fullscreen toggle.
- Use the Laser tool (
L) to point at things with a fading red trail while you talk; it never modifies the board.
Collections and search
- Collections group boards in the sidebar of the Boards tab. Create one with a name and an emoji; select it to filter the grid. Deleting a collection keeps the boards, it only removes the grouping.
- Search across boards: the search field on the Boards tab (two or more characters) matches text inside every board's elements and lists the hits with the board name and a snippet; click one to open that board.
- Search within a board: the editor has its own search bar for finding text on the current canvas.
Export
Open Export in the editor header. Formats:
| Format | Notes |
|---|---|
| PNG | Raster capture, best for screenshots |
| SVG | Vector, editable in design tools |
| Single A4 page with the board name and date in the footer | |
| PDF, slides | One page per slide; uses the curated presentation sequence when one exists, otherwise one element per page |
| Markdown | Text outline of the board, frames as headings |
| JSON | Raw canvas state |
A Fit to content toggle chooses between capturing the whole board or just what is currently in view.
Public sharing (read-only)
You can publish a board so anyone with the link can view it, without signing in and without being a workspace member.
- Open the board and click Share.
- Click Enable. Ithura generates a public link of the form
https://<app-host>/boards/<anchor>. - Copy the link (there is a copy button) and send it to your viewers.
The same dialog also gives you an Embed snippet: an <iframe> (default
size 800x500, which you can change) that drops a live, read-only view of the
board into any page that accepts HTML.
While sharing is on, the board shows a "Public" badge in the editor header and on its card in the board index. To stop sharing, open the same dialog and click Disable; the link stops working immediately and visitors see "Board not found". Re-enabling restores access under the same link.
What public viewers get:
- The same canvas, with editing fully disabled: they can pan, zoom, and use the Export menu, but cannot move, change, or add anything.
- A small "Ithura, read-only" mark in the header.
To let someone edit, add them to the workspace and project instead.
Keyboard shortcuts
Press ? in the editor (or the keyboard icon in the header) for the built-in
cheat sheet. Cmd on macOS is Ctrl elsewhere.
| Keys | Action |
|---|---|
V | Select tool |
C | Connect tool (source stays armed; Esc cancels) |
A | Arrow tool (drag anywhere; endpoints snap to nodes) |
S | Sticky note |
T | Text |
R | Rectangle |
F | Frame |
P | Pen |
I | Issue card |
E | Eraser |
L | Laser pointer |
Q to P | With a sticky or shape selected: pick palette color 1 to 10 |
Delete / Backspace | Delete selection |
Cmd + D | Duplicate selection |
Cmd + C / Cmd + V | Copy / paste selection |
Shift + click | Add to selection |
Shift + drag on canvas | Box-select |
Shift while dragging an element | Snap to alignment guides |
| Arrow keys | Nudge 1px (Shift = 10px) |
Cmd + Z | Undo |
Cmd + Shift + Z (or Cmd + Y) | Redo |
Space + drag | Pan |
| Scroll / two-finger swipe | Pan |
Pinch, or Cmd/Ctrl + scroll | Zoom |
| Double-click an edge | Edit its label |
| Paste | Insert an image from the clipboard |
? | Shortcuts overlay |
Esc | Cancel the active tool, close dialogs, exit presenting |
Troubleshooting
- A teammate does not appear on the board. Presence needs a live connection; check the dot on the presence pill in the header. Confirm you both have the same board open. The connection retries automatically after a drop, so a brief network blip resolves on its own.
- A shared link shows "Board not found". Sharing is disabled for that board, or the board was deleted. Open the board and re-enable sharing.
- Public viewers cannot edit. That is intended; public sharing is read-only. Add the person to the workspace and project to let them edit.
- A pasted image shows "upload failed". The image still renders for you from local data, but it was not stored, so it will not appear for others or after a reload elsewhere. Copy and paste it again once the connection is back.
- An element will not move. It is locked. Select it and use the unlock button in its hover toolbar or the inspector. Frames also move everything inside them; drag the element out of the frame if you meant to move it alone.
- The wrong thing gets selected when elements overlap. Use the stacking controls (bring forward, send backward) in the properties bar, and note that a selected arrow stays on top until you deselect it.
- Comments, sharing, or the issue palette are missing. You are editing a workspace board embedded in a wiki page; those panels are only available on project boards.